One of the most accessible and adaptable ways to build a website is by using a Content Management System (CMS). These systems allow you to create a foundation for your site in minutes, but one that will remain adaptable enough to grow and change with your business as it develops.
WordPress is the best CMS option, used by over 43% of all websites. Over 500 sites built on the WordPress system are added to the Internet every day. A plethora of pre-built themes and plugins help smaller businesses get up to speed quickly, while medium—and enterprise-level businesses invest in custom-built WordPress designs.
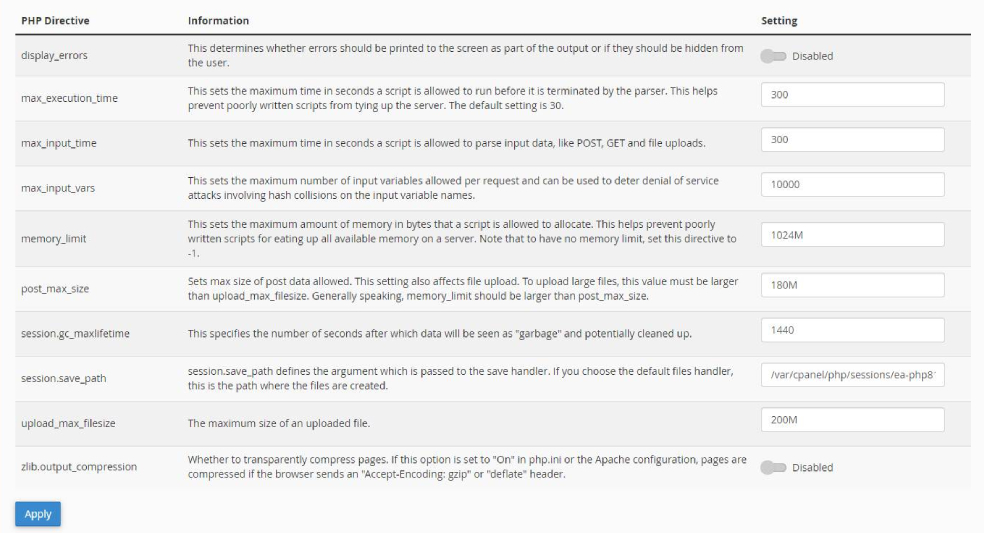
However, WordPress may only be suitable out of the box for some sites. By default, WordPress has a PHP memory limit of 32MB. This is sufficient for most simple sites, hosting just a handful of informative pages. However, if you encounter “WordPress memory exhausted” errors, your site is suffering from a lack of memory.
Some sites need more memory. Retailers, for example, need online shops, which are significantly more intensive to operate. A low memory limit can cause a slow site that puts off customers, costing your business money. So, what is the solution?
Is it possible to Increase WordPress Memory Limit?
The good news is that most hosting solutions have options to allow you to easily increase WordPress memory limits for the PHP on your site. This can often be done by logging into your hosting and looking for the PHP Configuration setting.
Many hosts use a suite of options called cPanel. If that is the case for your site, you can simply log into cPanel, click on the options link, and locate the memory_limit. By default, it is set to 32MB or a slightly more generous 64MB, but you can often increase it to 64MB, 128MB, or 256MB. For true powerhouse websites, you can push this limit to 512MB.

How to Increase PHP Memory Limit in WordPress without cPanel
If your host does not offer cPanel or their own brand alternative, you can still increase WordPress memory limit by manually making changes to your WordPress package. You will need access to either the wp-config.php file or the server’s .htaccess file.
Modifying wp-config.php
- ⦁ Log into your site using SSH or S/FTP.
- ⦁ If you see public_html, navigate into that folder.
- ⦁ Look for wp-config.php and open it.
- ⦁ Add the following code, replacing XXX with your desired memory limit:
⦁ Save and exit out of your editor.
Modifying .htaccess
- ⦁ Log into your site using SSH or S/FTP.
- ⦁ You should see .htaccess as a top-level file on your site.
- ⦁ Open the .htaccess file and add the following code, replacing XXX with your desired memory limit:
- ⦁ php_value memory_limit xxxM
- ⦁ Save the changes and exit the text editor.
If your SSH software does not have a built-in text editor, you can use the free text editor Notepad++ to make changes and then upload the edited file to replace the old one.
What to Do if These Methods Don’t Work
If these methods to increase WordPress Memory Limit do not work, you can try raising a ticket with your website host’s helpdesk. They will typically either make the change for you or direct you on how to use their hosting interface.
Ultimately, it’s on you, the webmaster, to keep an eye on the site and ensure it is running as you expect. By regularly testing the site, checking out all the functions and taking note of the results, you can ensure that your WordPress site is free from errors or disruptions that can impact user experience and cost your business a potential customer.


